Installation Instructions
Please read and follow these installation instructions carefully to ensure proper setup and optimal performance of the Ross Safety Door. Make sure to use all recommended tools and safety equipment, and review each step before beginning the installation. If you encounter any issues or have questions during the process, do not hesitate to contact our customer support team for guidance. Proper installation is essential for product reliability and safety.
Step One
Inspect the hinges for the type of pivot pin. Hinges with the common ‘knock out’ pins may be modified on installation with the door closed.
Step Two
Knock out the steel pins and replace them with equal size plastic pins. Hinges with pins riveted at both ends will need to be unscrewed. One end of the pin should be filed off, removed and replaced with the plastic pin. For the normal inward swing of the door these plastic pins operate as non-squeak, self-lubricating pivots, but in an emergency, with the door stops removed and when the door is firmly pulled outwards, the pins will sear into pieces, the hinges will come apart, and the door will be loosely supported by the flexible tie.
Step Three
The wooden door stops at the handle side and overhead must be removed.
Step Four
The long door stop at the handle side must be refitted and fastened only by 2 screw eyes 16 centimetres from the top and bottom. Remove or cut off the nails. Discard the overhead strip. Do not remove the hinge side door stop.
Step Five
Remove or disable any latch or locking device which, with the door stop unscrewed, would prevent the door from swinging outwards. Inbuilt door locks with retracting tongues are OK.
Step Six
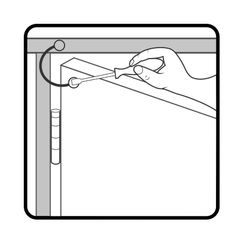
Above the top hinge, fasten the flexible tie in a loop – one end to the top door frame, and the other to the top of the door using wood screws and washers.
Step Seven
Attach the plastic covered notice to the outside of the door at eye level.
Step Eight
Refitting of the door after an emergency outward opening requires only new plastic pins and refitting of the long door stop.
Step Nine
All items underlined are supplied in The Ross Safety Door System. Replacement pins are available.


